HOMEWORK 08 - IMAGE PROCESSING
DUE: Wednesday, Mar 23rd, 8am
Images and Colors
Computer images are digital representations of objects. The elements in computer images are known as pixels, which is short for "picture element". We can manipulate computer images by manipulating the image's pixels. An image can be thought of as a 2D array of pixels. Each individual pixel is stored as an integer containing the amount of red, green, and blue, known as the primary colors. Each color can have a value from 0 (for none) to 255 (pure color).
In SFML, computer images are represented by objects of the Image class data-type. The following code illustrates how to create an Image object from a file containing the Colorado's beautiful flower.
if (!flower.loadFromFile("data/columbine.png")) { // loads the image file into the object
cerr << "Couldn't open image file!" << endl; return EXIT_FAILURE;
}
The flower image used in the example has 250 x 262 pixels. To obtain the pixel element of a specific location in the image, we use the getPixel function. This function's arguments are the (x, y) location of the desired pixel and returns a Color object, which is how SFML represents a pixel. A Color object contains the amounts of red, green, and blue of the associated pixel (in the Color object's properties named r, g, and b, respectively). The following code illustrates how to create a color object, set the color object's values to be the color of the pixel at location (10, 20), and display that pixel's color's components.
cout << "red: " << color.r << endl;
cout << "green: " << color.g << endl;
cout << "blue: " << color.b << endl;
Think carefully about what the code above is doing. It is taking one element of
a 2D image array (i.e.,
a Color object) and assigning it to a variable named
color. Within this Color object are three variables
(special integers) that you can access via the dot operator.
Conversely, you can change an image's pixel (i.e., change the color of
a pixel) using the setPixel function. This function's arguments are both the (x, y) location of the desired pixel to change and a Color object with the new values for the pixel. For example, the following code shows how to change the pixel element at the location (10, 20) to the color red. That is, we create a Color
object called color and initialize it with red turned on and
blue/green turned off. Then we call the setPixel function with
our Image variable (called flower).
flower.setPixel(10, 20, color);
In order for SFML to display an image in the window, two additional steps must be taken. First, the Image must be applied to a Texture.
myTexture.loadFromImage( flower );
Then the Texture can be applied to a Sprite and drawn to the window. A Sprite is a special type of RectangleShape that allows a Texture (and therefore Image) to be displayed on the rectangle. This step is accomplished by the following.
mySprite.setTexture( myTexture );
mySprite.setPosition( Vector2f( x, y ) );
window.draw( mySprite );
The rectangle for the sprite will automatically be properly sized based on the image in the texture. You will need to create textures and sprites for each of your modified images described below.
Instructions
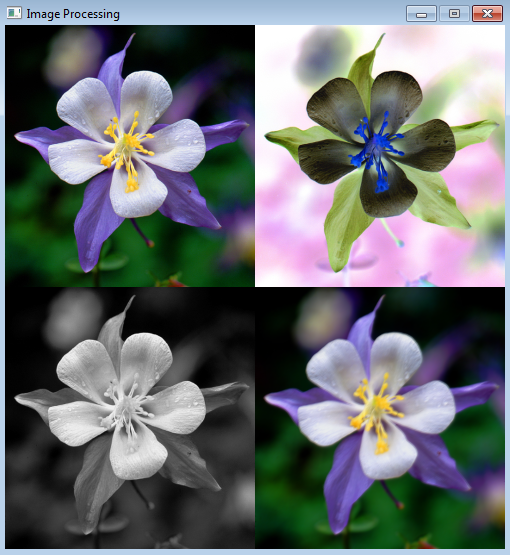
For this homework you are required to display the following window that shows four images in a 2x2 grid: the original columbine flower (at the upper left corner) and three transformations of it. You are welcome to use your own image file if you wish, in place of the flower file. If you use your own image, you must add the image to your project's data directory and change the constants IMAGE_FILE, WIDTH, and HEIGHT (defined in the provided source file below) accordingly. NOTE: If you use a different file, you must change the constants IMAGE_FILE, WIDTH, and HEIGHT back to their original values before submission.
To get started, first download the SFML Template and extract the contents of the zip. If needed, see Lab08B for details on extracting the contents of the provided zip file (specifically in the "Before You Begin" and "Open and Run the Project" sections).
Next, add the columbine flower image file to your SFML Project data's directory. Lastly, replace the main.cpp provided in the SFML template with this main.cpp. In this code,
notice how several 2D Color objects are created.
To complete this assignment, you need to implement the five functions described next. In each case, the first task is to assign each
pixel in the 2D image to the corresponding 2D Color object. Once done,
you'll then need to modify the red/green/blue values within each element of the 2D Color object based on the function you are implementing. How do you
do this modification? Give some thought to what this code does:
negPxels[0][0].g = 0;
negPxels[0][0].b = 0;
In order to get the downloaded project to compile, we suggest you add function prototypes and empty function definitions (maybe add just one line to the definition, an empty return). Then start working on the 'guts of each function, one at a time. Once you get the first two functions implemented, then you'll see the image displayed during execution.
A) getPixels
This function takes two parameters: an Image object and a 2D array of Color objects (with size WIDTH x HEIGHT). WIDTH and HEIGHT are pre-defined constants with the dimensions of the columbine flower image in pixels. Again, if you are using your own image file, make sure you update the WIDTH and HEIGHT constants accordingly (and change them back before submitting your main.cpp file). Your getPixels function should load the image's pixels into the array of Color by calling the Image's getPixel function. The function should return no value.
B) setPixels
This function takes two parameters: an Image object (passed by reference) and a 2D array of Color objects (with size WIDTH x HEIGHT). Your setPixels function should use this array of Color argument to update the image's pixels by calling the Image's setPixel function (described previously). The function should return no value.
C) doNegative
This function takes only one parameter: a 2D array of Color (with size WIDTH x HEIGHT). In this function you will convert each pixel of the array so that it has the opposite value of each color component. This task is done by subtracting each color component value from 255 (e.g., the new value for red is 255 minus the original value for red, the new value for green is 255 minus the original value for green, etc.). The function should return no value.
D) doGrayScale
This function takes only one parameter, a 2D array of Color (with size WIDTH x HEIGHT), and returns no value. In this function, you will convert each pixel of the array to a black-and-white pixel with shades of gray. The color gray appears when the red, green and blue components have the same value. Thus, to convert to gray, we need to calculate an average value for the red, green and blue components and set all three components to that average value.
However, we will not use just a straight average value. Luminance is the attribute that describes how light or dark things are. It is our perception of the amount of light reflected by an object. The human eye perceives blue to be darker than red, even if the same amount of light is being reflected. To account for this difference, the doGrayScale function will weight the red, green, and blue components differently, and use the weighted average as the value for the gray scale. Specifically, the method will use a weighting of 0.299 for the red component (defined by constant RED_WEIGHT), 0.587 for the green component (defined by constant GREEN_WEIGHT), and 0.114 for the blue component (defined by constant BLUE_WEIGHT); these constants are defined in the
main.cpp code you grabbed.
To summarize, for each pixel, you need to calculate the weighted average of the three color components and use that value to set the new pixel value. For example, if the color was (5, 10, 15) for (red, green, blue), then the weighted average is: RED_WEIGHT * 5 + GREEN_WEIGHT * 10 + BLUE_WEIGHT * 15 = 12.879; we then make a color with red, green, and blue equal to the integer part of this computation, i.e. color(12, 12, 12).
E) doSpecial
This function takes only one parameter, a 2D array of Color (with size WIDTH x HEIGHT), and returns no value. In this function, you need to design and implement your own image processing algorithm. The goal of your algorithm must be clearly stated using comments in your code. Your algorithm must not be trivial (e.g., just adding a constant value to all pixel elements) and the result must be clearly visible in the processed image. In other words, full credit is only possible if your doSpecial function is not trivial. Some possible ideas:
- blur effect (e.g., average several neighboring pixels to blur the image),
- barrel distortion effect (a.k.a. fish eye effect),
- infrared effect,
- puzzle effect (i.e., divide the image into a square number of smaller blocks that are displayed in different locations within the picture).
You are encouraged to research image processing algorithms online to get ideas. Haven't you ever been curious about how photoshop, gimp, and other image processing programs do their cool filtering effects? Now is your chance to implement these effects yourself! Adobe should be on the lookout!!!
Submission
You need to submit your solution of this homework (HW08) with two lab assignments: Lab08A and Lab08B. Detailed generic instructions for submitting homework assignments are available. For homework due Wednesday (Mar 23rd), follow these specific steps:
- create a directory called week08.
- within week08, create three subdirectories: Lab08A, Lab08B, and HW08.
- within your new week08/Lab08A directory, copy in your main.cpp file from your Lab08A solution.
- within your new week08/Lab08B directory, copy in your main.cpp file from your Lab08B solution.
- within your new week08/HW08 directory, copy in your main.cpp file from your HW08 solution.
- compress the week08 directory (see Step 3 here for details).
- submit the week08.zip file to Blackboard (see Steps 5-10 here for details).
- after you submit, download the file and double check it contains all that you think it contains!