
The Works of Melvin Blishtar
Lab 00 - Part A
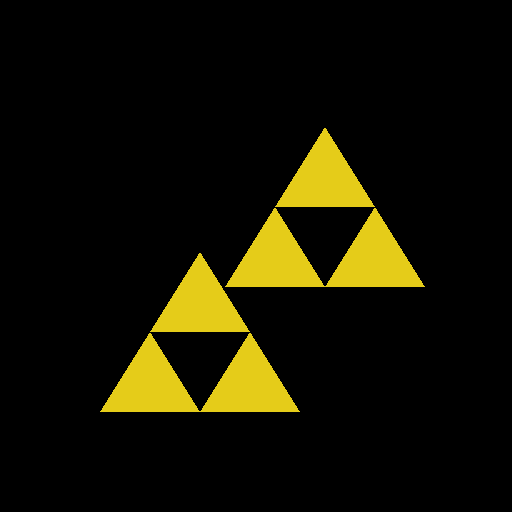 After being walked through the initial concepts, this part of the lab resulted in two pyramids of triangles
created by different means. The first was hard coded and the second was created by calling a
function three times and using transformations to position the pieces.
After being walked through the initial concepts, this part of the lab resulted in two pyramids of triangles
created by different means. The first was hard coded and the second was created by calling a
function three times and using transformations to position the pieces.
Lab 00 - Part B
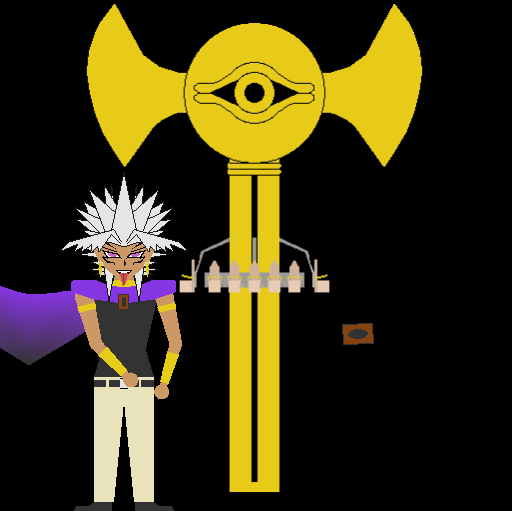
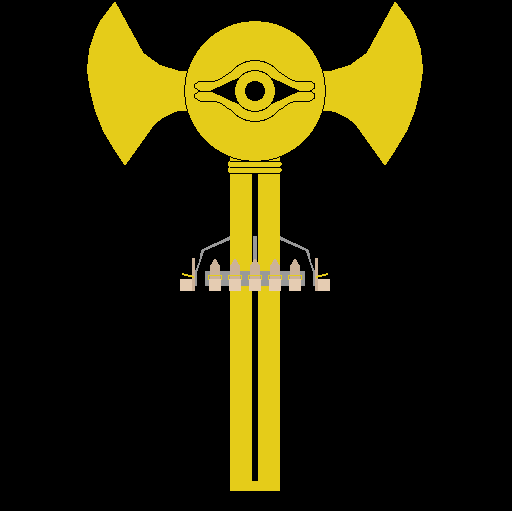 After being asked to create a 2D drawing of what our ride would look like, I used hundreds
of triangles to create this masterpiece. Themed after the ancient egyptian artifact known
as the Melenium Rod, this vertical drop is not for the faint of heart. My favorite feature
is the decorative eye in the center of the topper, which uses a 7 line function to draw
circle of a given radius using 40 well placed triangles. This function makes use of C++'s
sine and cosine functions to determine the position of each triangle vertex.
After being asked to create a 2D drawing of what our ride would look like, I used hundreds
of triangles to create this masterpiece. Themed after the ancient egyptian artifact known
as the Melenium Rod, this vertical drop is not for the faint of heart. My favorite feature
is the decorative eye in the center of the topper, which uses a 7 line function to draw
circle of a given radius using 40 well placed triangles. This function makes use of C++'s
sine and cosine functions to determine the position of each triangle vertex.
Assignment 1
Given a short list of requirement, we were asked to draw out and crest to represent our
character's home town along with our character's name using only OpenGL primitives.
Lab 01
 We were walked through the beginner steps of 2D animation using callback functionality.
In the end we were able to make our pyramid drawn in Lab00 continually spin around. The
spinning pyramid will also follow your mouse around the screen. The pyramid turns red
when the mouse is right clicked and returns to its original gold color when the mouse
button is released. You can also change the color by pressing the C key on your keyboard.
We were walked through the beginner steps of 2D animation using callback functionality.
In the end we were able to make our pyramid drawn in Lab00 continually spin around. The
spinning pyramid will also follow your mouse around the screen. The pyramid turns red
when the mouse is right clicked and returns to its original gold color when the mouse
button is released. You can also change the color by pressing the C key on your keyboard.
Assignment 2
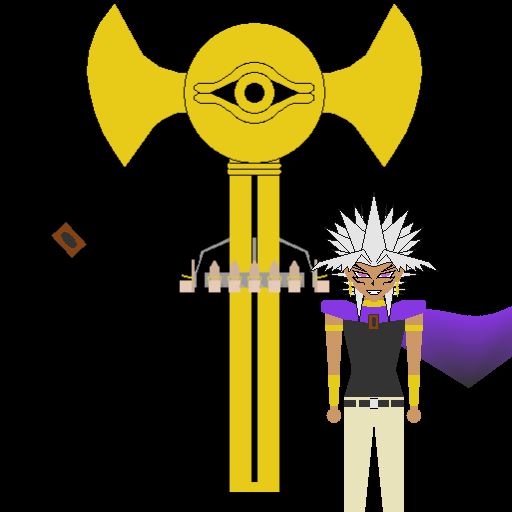 After learning how to animate our 2D drawings, we were asked to draw out our characters.
Using only OpenGL primitives, Melvin Blishtar is now an animated and interactive creation.
A feature of constant animation is his cape flowing in the wind.
Whenever the user clicks their left mouse button, he sticks his tongue out and raises his eyebrows.
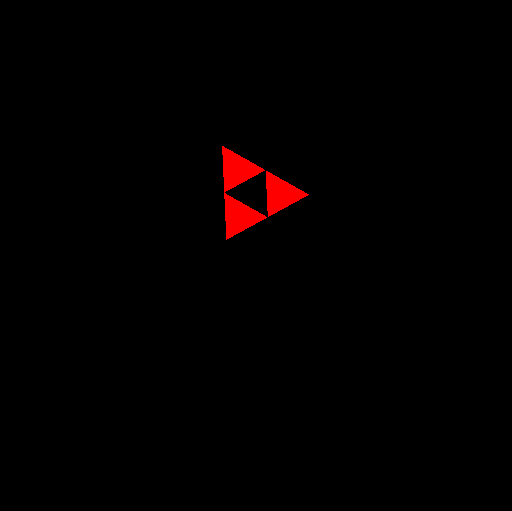
The users cursor is also constantly followed by a spinning Yu-Gi-Oh card.
Pressing the right mouse button will cause the spinning card to be thrown at Melvin.
Once the thrown card has entered the range of his heart, it will disappear and be replaced by
a new card back at the cursor.
Melvin can be moved around the screen by pressing the arrow keys as well as the ASWD keys.
Additionally, his cape switches sides depending on whether he's moving left or right.
If the user presses SHIFT + D, Melvin will start dancing.
If the user presses SHIFT + S, he will stop his dancing.
Pressing either ESCAPE or Q will exit the program.
After learning how to animate our 2D drawings, we were asked to draw out our characters.
Using only OpenGL primitives, Melvin Blishtar is now an animated and interactive creation.
A feature of constant animation is his cape flowing in the wind.
Whenever the user clicks their left mouse button, he sticks his tongue out and raises his eyebrows.
The users cursor is also constantly followed by a spinning Yu-Gi-Oh card.
Pressing the right mouse button will cause the spinning card to be thrown at Melvin.
Once the thrown card has entered the range of his heart, it will disappear and be replaced by
a new card back at the cursor.
Melvin can be moved around the screen by pressing the arrow keys as well as the ASWD keys.
Additionally, his cape switches sides depending on whether he's moving left or right.
If the user presses SHIFT + D, Melvin will start dancing.
If the user presses SHIFT + S, he will stop his dancing.
Pressing either ESCAPE or Q will exit the program.
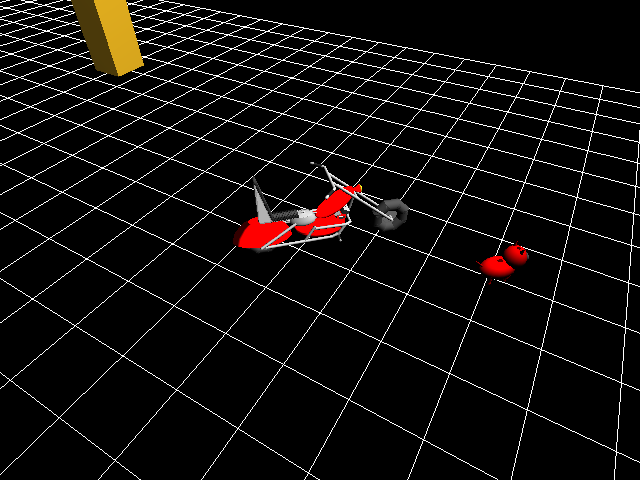
 In this image, Melvin is dancing while sticking his tongue out at you.
For you see, that's what happens if you decide to judge him for wearing as much jewelry as he does.
In this image, Melvin is dancing while sticking his tongue out at you.
For you see, that's what happens if you decide to judge him for wearing as much jewelry as he does.
Lab 02
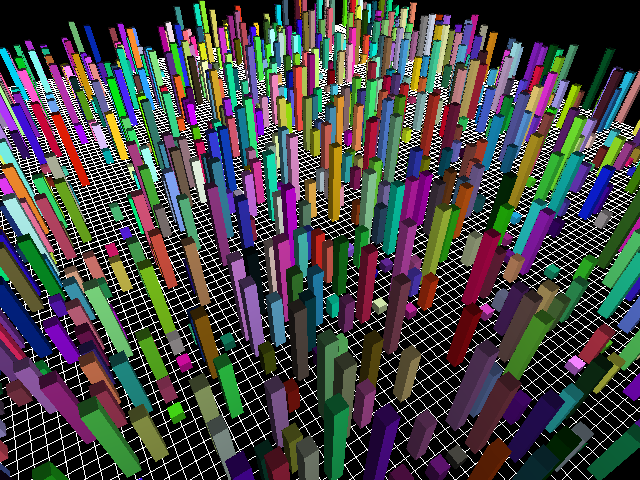 We were walked through the beginner steps of drawing in 3D and setting up our camera for our
virtual world. The result was a large city with buildings placed randomly along its streets.
The buildings are of random heights and colors. The camera setup is a freestyle cam.
Pressing W moves the camera forward and pressing S moves the camera back.
Left clicking and dragging the mouse rotates the camera around to look at the world at
different angles.
Pressing either ESCAPE or Q will exit the program.
We were walked through the beginner steps of drawing in 3D and setting up our camera for our
virtual world. The result was a large city with buildings placed randomly along its streets.
The buildings are of random heights and colors. The camera setup is a freestyle cam.
Pressing W moves the camera forward and pressing S moves the camera back.
Left clicking and dragging the mouse rotates the camera around to look at the world at
different angles.
Pressing either ESCAPE or Q will exit the program.
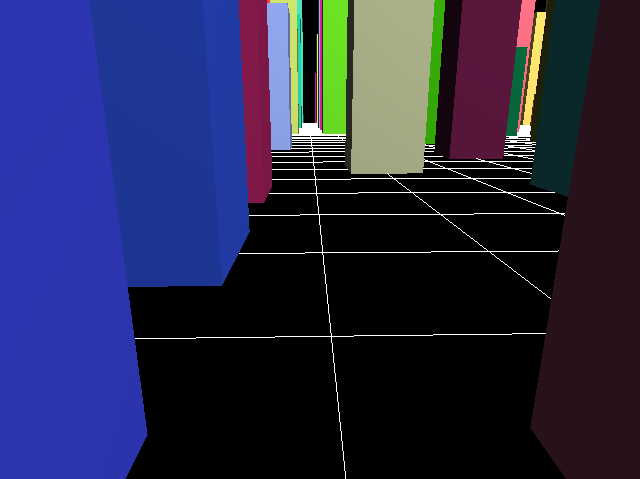 This image displays my navigational skills with the freestyle camera. The camera is pointing down a street
between two buildings.
This image displays my navigational skills with the freestyle camera. The camera is pointing down a street
between two buildings.
Assignment 3
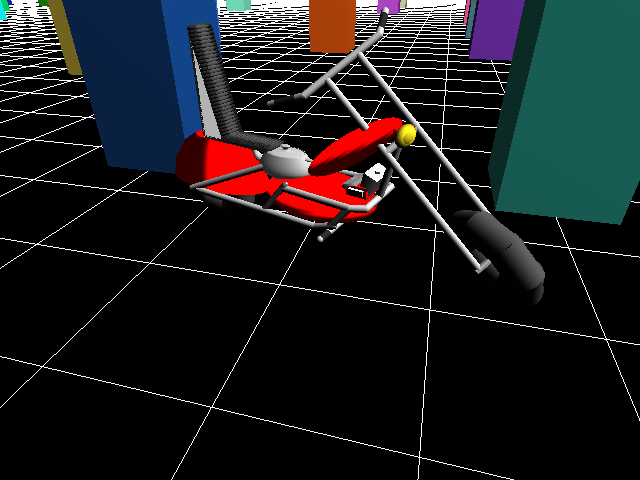
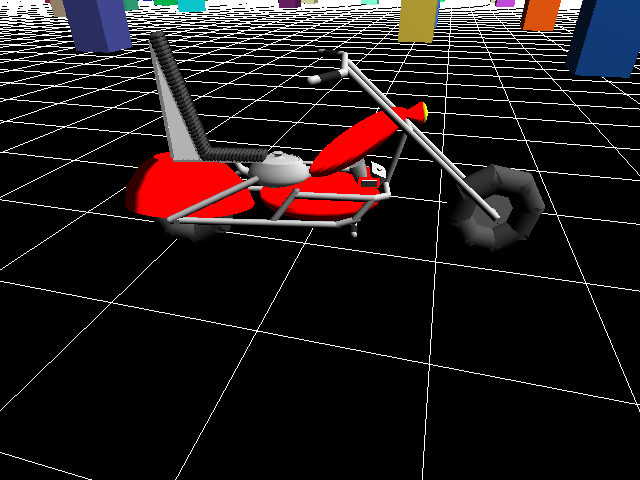 After learning how to animate our 3D drawings, we were asked to draw either our character or
or a vehicle for them to ride on. I selected a simple motorcycle (that 15 hours to build).
Using the 3D objects provided to us (code from instructor), Melvin's Motorcycle was constructed
with very careful coordinate placement.
A feature of constant animation is the pistons on the engine alternately oscillating up and down.
Pressing (or holding down) the W key will move the bike forward while pressing S will move it backwards.
The motorcycle's wheels turn in relation to which direction the bike is moving.
Pressing A will turn the bike left and D will turn it right.
There is some added animation where the front of the bike (handle bars,
headlight, front wheel and connection pipes) turns in the direction that the
vehicle is turning. Once both A and D have been released, the front of
the bike will straighten out. This animation is not instantaneous, but takes
the time to show a smooth transition between states.
Left clicking and dragging the mouse moves the camera around the bike in an
arcball fashion.
If you hold down SHIFT before left clicking and dragging, the camera will zoom
in and out based on whether you are dragging up or down on the screen.
You can also zoom in and out using the scroll on your mouse.
Pressing either ESCAPE or Q will exit the program.
Added bonus, can you tell what shape the seat support is made out of?
After learning how to animate our 3D drawings, we were asked to draw either our character or
or a vehicle for them to ride on. I selected a simple motorcycle (that 15 hours to build).
Using the 3D objects provided to us (code from instructor), Melvin's Motorcycle was constructed
with very careful coordinate placement.
A feature of constant animation is the pistons on the engine alternately oscillating up and down.
Pressing (or holding down) the W key will move the bike forward while pressing S will move it backwards.
The motorcycle's wheels turn in relation to which direction the bike is moving.
Pressing A will turn the bike left and D will turn it right.
There is some added animation where the front of the bike (handle bars,
headlight, front wheel and connection pipes) turns in the direction that the
vehicle is turning. Once both A and D have been released, the front of
the bike will straighten out. This animation is not instantaneous, but takes
the time to show a smooth transition between states.
Left clicking and dragging the mouse moves the camera around the bike in an
arcball fashion.
If you hold down SHIFT before left clicking and dragging, the camera will zoom
in and out based on whether you are dragging up or down on the screen.
You can also zoom in and out using the scroll on your mouse.
Pressing either ESCAPE or Q will exit the program.
Added bonus, can you tell what shape the seat support is made out of?
Lab 03
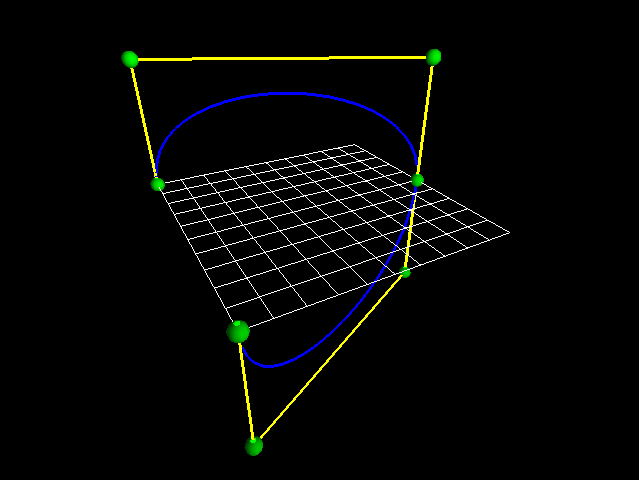 We were walked through drawing the control cage for a Bezier curve and then drawing the curve.
Assignment 4
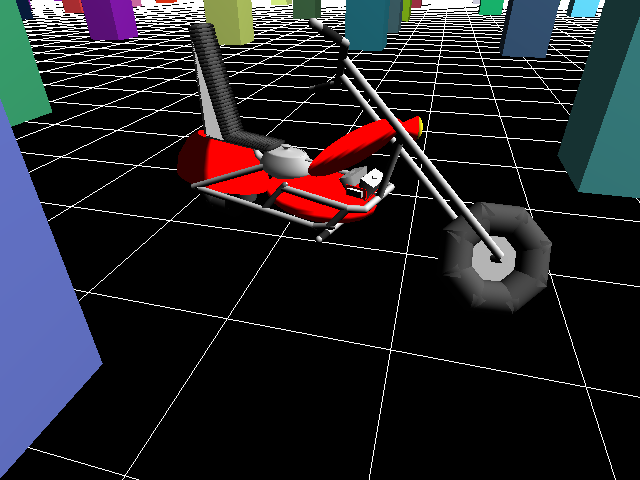
 After learning about Bezier curves, we were asked to draw a 3D mascot to follow our character/vehicle
around. The mascot would move along a Bezier curve around the vehicle and have its own animation.
So, I built on my code from Assignemnt 3 by added some code from Lab 03 and adding the functionality
to draw my mascot. The mascot I choose is a less detailed version of the monster "Doomdog Octhros".
I'll just call him Doomdog. Anyway, the program has all of the same features as Assignment 3 with
the following additions.
Pressing 'y' for yellow toggles the control cage and its control points on and off.
Pressing 'b' for blue toggles the Bezier curve on and off.
The mascot executes constant animation with two motions.
The first motion is his tails wagging back and forth.
The second motion is his front and back legs lifting off the ground and then returning
as if he is leaping to his next position.
After learning about Bezier curves, we were asked to draw a 3D mascot to follow our character/vehicle
around. The mascot would move along a Bezier curve around the vehicle and have its own animation.
So, I built on my code from Assignemnt 3 by added some code from Lab 03 and adding the functionality
to draw my mascot. The mascot I choose is a less detailed version of the monster "Doomdog Octhros".
I'll just call him Doomdog. Anyway, the program has all of the same features as Assignment 3 with
the following additions.
Pressing 'y' for yellow toggles the control cage and its control points on and off.
Pressing 'b' for blue toggles the Bezier curve on and off.
The mascot executes constant animation with two motions.
The first motion is his tails wagging back and forth.
The second motion is his front and back legs lifting off the ground and then returning
as if he is leaping to his next position.
 This image displays when both the control cage and Bezier curve have been toggled off.
Lab 04
 We were walked through the basics of creating different light sources and handling their featuers.
This lab features a faint light emiting from the center of the 3D world and a spotlight coming
from the plane of a flight simulation. The spotlight will light the elements in front of the plane.
So hopefully, you won't be crashing into any buildings. We can also toggle theses lights on and off,
though I don't recommend trying to fly with both lights off.
We were walked through the basics of creating different light sources and handling their featuers.
This lab features a faint light emiting from the center of the 3D world and a spotlight coming
from the plane of a flight simulation. The spotlight will light the elements in front of the plane.
So hopefully, you won't be crashing into any buildings. We can also toggle theses lights on and off,
though I don't recommend trying to fly with both lights off.
Roller Coaster Tycoon
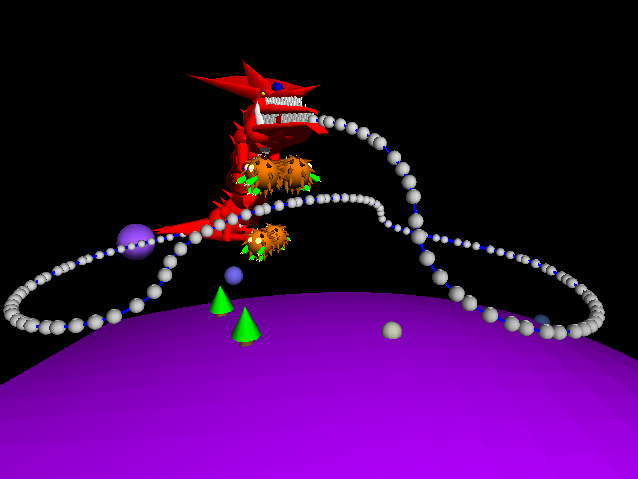 The class formed into groups of three. Combining everything we've learned so far, we were told to create
a roller coaster. Ann Gustafson (Guy Fieri), Edgar Gutierrez (Florence), and I (Melvin Blishtar) decided
to draw out a Slifer the Sky dragon roller coaster. The world can be made with two different input files
that provide two different tracks for the coaster to follow. There are several camera options that you can
chose from and toggle through using the 1-8 keys.
The class formed into groups of three. Combining everything we've learned so far, we were told to create
a roller coaster. Ann Gustafson (Guy Fieri), Edgar Gutierrez (Florence), and I (Melvin Blishtar) decided
to draw out a Slifer the Sky dragon roller coaster. The world can be made with two different input files
that provide two different tracks for the coaster to follow. There are several camera options that you can
chose from and toggle through using the 1-8 keys.
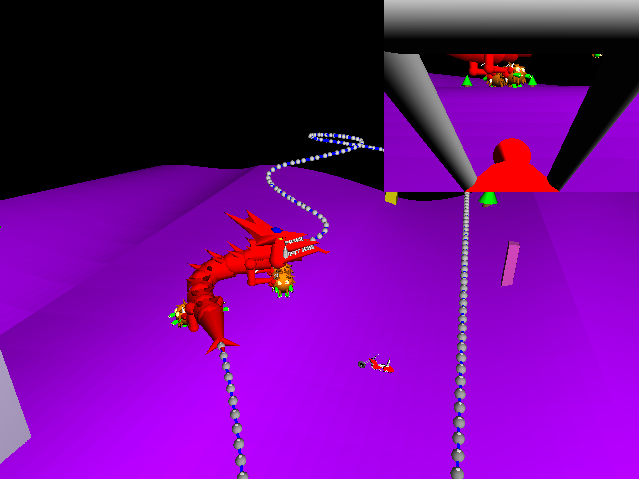 Just look at that awesome split screen. The main portion of the screen displays a freeCam,
while the top right corner displays a first person view of the motorcycle that you can move
about the world.
Just look at that awesome split screen. The main portion of the screen displays a freeCam,
while the top right corner displays a first person view of the motorcycle that you can move
about the world.
Lab 05
 Look at that sweet texturing job! I would buy that teapot!
Lab 08
 Where's lab 6 and 7? Well, they don't exist. We were working on the Roller Coaster Tycoon project instead.
But look at this sweet hellknight hanging out on top of a metal platform!
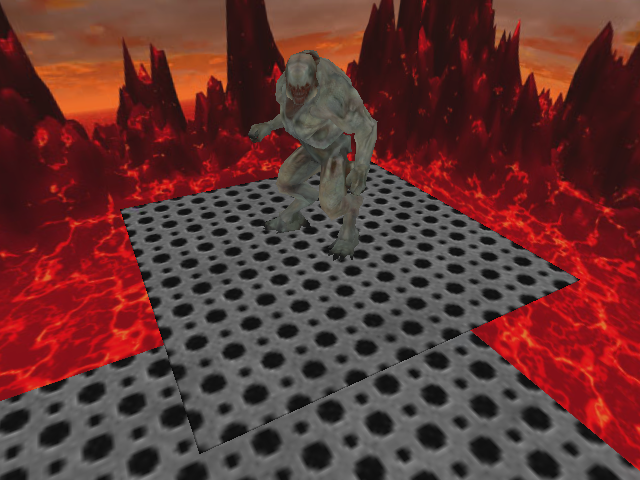
Where's lab 6 and 7? Well, they don't exist. We were working on the Roller Coaster Tycoon project instead.
But look at this sweet hellknight hanging out on top of a metal platform!
Lab 09
 This lab demonstrates using shaders to texture objects. This teapot is given different colors to
different pixels depending on the vertex position in our 3D world. The shaders also work to stretch
just the corner of the pot and make it ocilate back and forth.
This lab demonstrates using shaders to texture objects. This teapot is given different colors to
different pixels depending on the vertex position in our 3D world. The shaders also work to stretch
just the corner of the pot and make it ocilate back and forth.
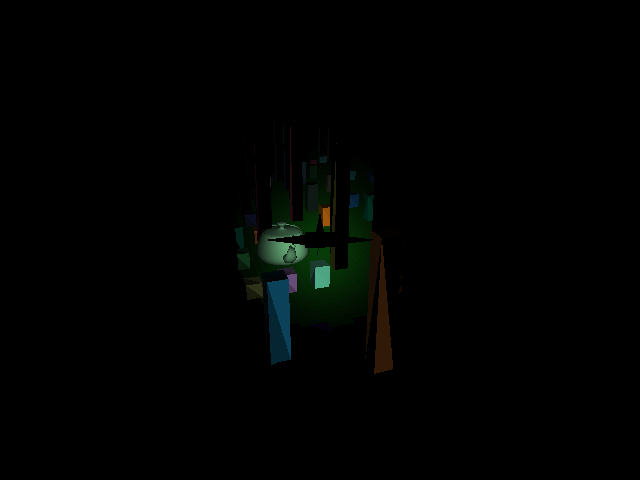
Assignment 4
 Honestly hated this assignment. Then again, I didn't have enough time between other classes to
really figure out what I was doing. Anyway, I used shaders and textures to create a lovely
sky box to place our objects in an environment instead of a black void. There are two shading programs
being used here. One is applied to our sky box and platform, while the other is applied to our object
in the center (making it wonderfully colorful). I chose to have it make the object colorful since I
didn't get the full lab completed and I didn't like just having a plain white blob floating in the
middle of the world.
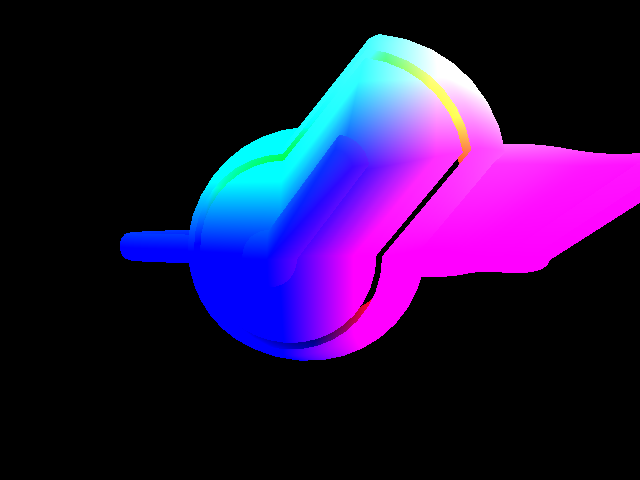
Honestly hated this assignment. Then again, I didn't have enough time between other classes to
really figure out what I was doing. Anyway, I used shaders and textures to create a lovely
sky box to place our objects in an environment instead of a black void. There are two shading programs
being used here. One is applied to our sky box and platform, while the other is applied to our object
in the center (making it wonderfully colorful). I chose to have it make the object colorful since I
didn't get the full lab completed and I didn't like just having a plain white blob floating in the
middle of the world.
↑ Back to Top ↑
Author: Emily Dederick
Contact at edederic@mymail.edu