LAB 07C - STAR MAP
Concepts
This assignment provides experience with drawing pixels with different color intensity on a graphical window using a special framework called Simple and Fast Multimedia Library (SFML). This lab will be submitted with homework 07 (after the exam).
SFML
SFML is a multimedia Application Programming Interface (API) written in C++ with bindings for various programming languages, including Java, Python, and Ruby. SFML provides an easy way to write code that requires graphics and/or sound effects. SFML is the chosen platform for many cool games, including the Atom Zombie Smasher.
Before you Begin
For this specific homework you should download this project template that has initial code and other resource files for you to get started. This file should work with any visual studio installation (on campus or on your home computer). Start the extraction process now, and then read the rest of these instructions (as the extraction process might take some time). Say what? How do I "extract"?
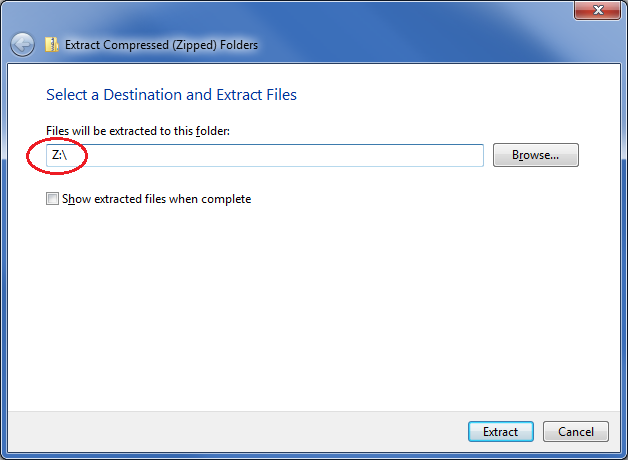
First, save the file linked above to your Z drive!
Note: we will always assume you are working on a Mines computer. It is your responsibility to modify these instructions if not.
After you've downloaded the zip file, you need to extract the contents. (We always use Windows Explorer to move and extract contents of a zip file.) You can extract the contents of the zip file anywhere onto your Z drive, but it must be on your Z drive (might as well put it into your CSCI261 folder).
- Click on the Start button and select Computer in the middle of the right side of the menu. This opens Windows Explorer, not to be confused with Internet Explorer.
- Navigate to the zip file downloaded previously.
- Right-click on the zip file and choose Extract All... from the pop-up menu.
- In the dialog that opens, delete what is there and type Z:\
Again, you may specify any folder on your Z drive (other than the adit folder), but it must be on your Z drive. If you want to place in your CSCI261 folder, then type the following for the extraction folder:
Z:\CSCI261\
- Click Extract. Depending on your system's configuration, you may be asked whether you want to copy the extraction process without encryption. If you are asked, mark the option ''Do this for all current items'' and click YES. See the example below.
- Then, using Windows Explorer, rename the project folder to Lab07C.
The next step is the most important in the process ... please be careful!

Open and Run the Project
- Launch Visual Studio, if you haven't already.
- When the IDE is loaded, pull down the FILE menu, expand the Open sub-menu, and select Project/Solution...
- Navigate to the Lab07C folder created in the previous step.
- Select sfml-template.sln and click the Open button.
- Now, right click on Solution 'sfml-template' and rename the Solution to Lab07C. Do the same thing for the Project.
Instructions
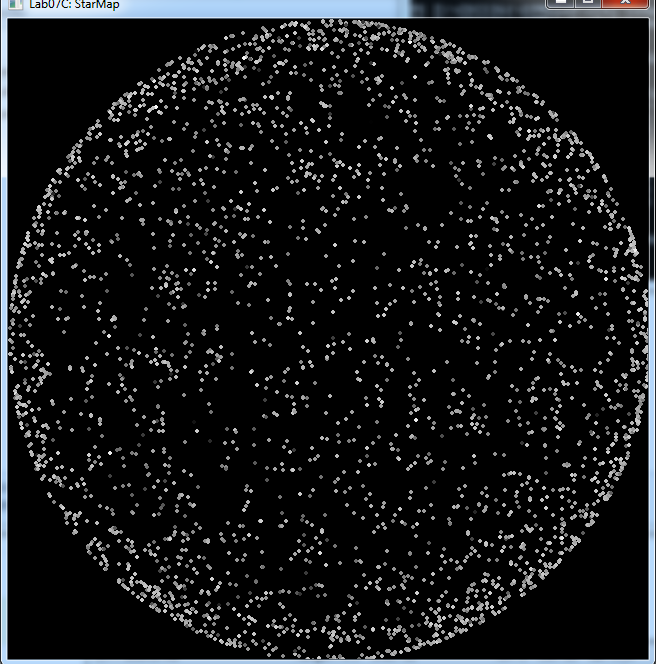
Your task for this lab is to read the data file containing star information that you created from Lab 07B, and then draw a star map similar to the one shown here:
Data File
The project template contains a data directory named data.
Copy the file
ModifiedStars.txt you created from Lab 07B
to the data directory in this project template. You will then need
to open the file data/ModifiedStars.txt.
Your ModifiedStars.txt file should consists of three fields:
- The first two fields are the x and y coordinates for the star. The coordinates are in SFML's coordinate system, i.e., position (0, 0) is in the upper-left corner of the picture, and the maximum x and y values are the width and height of the picture (in pixels).
- The third field is the brightness of the star, and all brightness fields should be between 0.0 and 8.0.
Drawing a Star
In your code, you'll need to draw a star. Since stars look like circle, use the CircleShape class. Each circle needs a non-zero radius; use the setRadius function to set this to 2. Then, use this star object to draw each star as you read its properties (i.e., coordinates and brightness) from the data file. For example, to set a star at position xPixel and yPixel use the following:
A star can be drawn on the window using the following function call:
Shades of Gray
One of the most common ways to represent colors is with the RGB color model. In this model, each color is represented with three numbers in the range 0 to 255 that represent the amount of red, green, and blue to include in the color. For example, (255,0,0) is the color red and (255,255,0) is the color yellow (i.e., red and green combined). Any color with the same amount of red, green, and blue is a shade of gray. We will use shades of gray to draw our stars with different brightness; thus, in this project, you should include the same amount of red, green, and blue in your colors drawn (but feel free to play with the other more colorful colors!)
SFML has a color function that allows the drawing of specific colors using the RGB model. For example, each of the following examples sets the fill color of a star to a different shade of gray:
star.setFillColor(Color(0, 0, 0));
// Dark gray
star.setFillColor(Color(64, 64, 64));
// Medium gray
star.setFillColor(Color(128, 128, 128));
// Light gray
star.setFillColor(Color(192, 192, 192));
// White
star.setFillColor(Color(255, 255, 255));
To determine the shade of gray for each star drawn in this project, you need to scale the brightness value of the star to an integer value between 0 and 255 and set the fill color using that value, as shown above. For example, if brightness is a double variable holding a star's brightness value in the range 0.0 to BRIGHTEST_STAR, to convert it to an integer value in the range 0 to 255, you would use the following:
You would then use this shadeOfGray variable to set the drawing color and fill color:
Putting It All Together
Open the file data/ModifiedStars.txt and use a while loop to read each of its lines. As you read, do the necessary color conversions for the brightness, set the star's position and color, and draw it on the graphical window.
Use the following steps as a guide:
- declare an ifstream object associated with the modified stars map data file;
- verify that you were able to open the file;
- declare all the variables you will need;
- structure your file reading loop, doing the following at each iteration:
- read all values of the current line;
- position the star object accordingly;
- determine the star's shade of gray based on its brightness;
- set the star object fill color;
- draw the star object;
- close the data file.